Visit All Brands!Silver Reed SK-840 Studio Standard Gauge  Metal Single Bed Knitting Machine 4.5mm Needle Spacing x 200 Needles

Machine Knit Bucket Hat

Lucia Liljegren, The Knitting Fiend.

Rosie Bucket HatThis knitting fiend web page has a pattern generator (aka program) to create a pattern to help you knit a bucket hat using any knitting machine.   (If you don't own a knitting machine, you can browse machines available at All Brands on this list I compiled.)

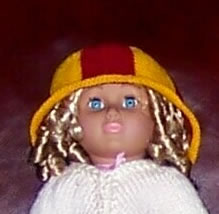
I made Colocha's hat, pictured below in two colors to illustrate the construction. Shy, retiring humans will likely prefer a single color hat; rowdy ones may want a two color hat in team colors to wear to sports events. (Really rowdy ones may want 8 colors.)  

I'm planning to design a hand knit version of the pattern soon; it will be knit from the bottom up.  So, it will be difficult to make one just like Colocha's using that construction  method.  If you are a hand knitter, and you like the way Colocha's hat looks, you can knit a hat sideways as this one is.  However, you will need to keep track of rows and stitches.   You can do that on paper, but it's helpful to count rows using a knit register, available at Joanne.com. )

Main siteblog (read the latest)hat collection, and Poncho & Cape collection.

Characteristics of the hat: rosie
  • Knit sideways using short rows.
  • You may vary the hat size to fit any head, and you may also vary the overall diameter of the hat.
  • Has a small flared out brim.

To design your hat you will need to enter your head circumference and tightness factor below.  You must also specify the stitch and row gauges. 

Have fun knitting and wearing your hat,
Lucia
Google
 
Web thedietdiary.com


Patterns are worth something. Custom patterns should be worth even more.  This is sort of "shareware".   If you knit one of these, please send me a $3 donation.  Pictures are welcome too!


Enter Data for Your Hat Data

You must modify the following data to match the gauge and shape you want!  Just change the numbers; it recalculates automatically. 


Replace My Gauge Swatch Information Your Gauge Swatch Information
Stitches per inch:  Replace My Hat Shape Parameters with Yours

You must use the same machine setting when knitting the swatch and the hat.  Note your machine setting on your directions in pen.  (Bond owners, mark the key plate.)

You can experiment with the gauge for your hat. I knit the yarn for Colocha's hat at a tight gauge relative to the yarn thickness; this makes a firm hat to imitate felted fabric with acrylic yarn.  You can also knit at a loose gauge relative to the yarn thickness to make a floppier hat.  If you  plan to felt the hat, knit the yarn at a loose gauge.  It will tighten up when you felt it.

Wash, dry and if appropriate, steam the swatch using the method you plan for your garment before entering the gauge. If you are felting this hat, use wool or some yarn that felts.  Knit your swatch, then throw it in the washing machine with a load of whites.  Take it out, press it, and measure the gauge after felting.
Rows per inch:


Replace my doll's head circumference with yours and pick a tightness factor. 
Data to enter.
Information.
Head circumference
inches.
This is sized for Colocha, my doll.  A medium woman's head would be about 22".  Men's heads are 1-2" bigger.  Kids are 2-3" smaller.  It's best to measure heads; measure around your head.  If you don't know someone's head size, you can guess by reading typical sizes at this page of head sizes.
Tightness factor percent.  If you like a very snug hat band, enter up to 10%.  If you like a very  loose hat enter -10%.
Based on your head circumference and tightness factor, and rounding to the nearest multiple of 8 rows, the hat circumference will be inches around.


Results: Your Hat Pattern

Don't try to edit anything below this point. 

This is a program. So, please read through al the directions and make sure no negative numbers appear.  (I try to think about where they might appear and create a warning box, but I don't always think of them all.)

Machine knitters: Read through the hat to  make sure you don't run out of needles. The two values to look at carefully are: 1) The number of needles to raise in step 1 or the main hat, and the number of needles to raise when you knit the trim for the edge. ( The purpose of the trim is to prevent the edge of the hat from curling inward.  If the trim requires too many needles, you can knit it in two pieces and seam. Otherwise, you can get a book of trims and substitute something else. A bias trim would probably look nice.)

Yarn Estimate:

This depends on your yarn. Hats rarely take more than 4 ounces. Rosemary's hat is knit with 2 ounces of Jagger Spun  Mainline 2/8 in red.


Knitting Instructions.

Some abbreviations: RC = Row count read out.  COR= Carriage on Right. COL = Carriage on Left.

Main Hat Piece.

Notes:
  1. Raise     needles to work position (B on a Brother). 
    1. Count   needles from the far right needle and note the right hand needle number here:  R= __________. (The crown will be formed on stitches to the right of this needle.)
    2. Count over   needles from the far left needle and note that needle number.  Note that needle number here: L=______.  (The brim will be formed on the stitches to the left of this needle.) 
  2. Prepare to knit.
    1. Set machine tension (or key plate) to your chosen value.  Thread carriage with waste yarn.   Knit a few rows end with COL.
    2. Thread machine with ravel cord or crochet cotton. Knit 1 row. Break yarn.
  3. Start hat: Thread machine with fashion yarn in the color you prefer, and set to your chosen machine tension.
  4. You will work short rows to shape the hat.  You will probably want to hang weights. To reduce the effects of mathematical rounding, and  produce a hat that actually fits, the instructions describe two sizes of short row wedges.   The second wedge may, or may not be, be two rows shorter than the first.  I hang rows markers to indicate the number of wedges I have knit-- this helps me avoid accidentally knitting 1 too few or 1 too many wedges.  
    1. First Wedge:  Option: change yarn colors when you repeat this.
    2. Set machine to partial knitting (Hold on a Brother.)
    3. Hang a row marker on the left edge to keep count of the  number of wedges.  Zero Row counter. RC=0.
    4. K1 row.  COL.
    5. Move  needles on the far right hand side  from work (B) to hold (E) position .  (This leaves only    needles in work position!) K1 row, wrap needle.  K1 row. End COL;   RC=3.
    6. Do the following    times.  Move    needles from hold to upper work (D) position.  K1 row, wrap a needle,  K1 row. End COL.
    7. Do the following times. Move    needles from hold to upper work position. K1 row, wrap,  K1 row. End COL.    
    8. The needles to the left of the needle you marked in step 1b should all be in work (B) now.  The row count should be  RC= .)
    9. Move the next  needles into upper work position (D). (The needles furthest to the right are still in hold.) K1 row, wrap,   K1 row. End COL; RC= .
    10. Do the following times.  Move    needles from hold to upper work position. K1 row, wrap, K1 row. End COL
    11. Do the following times.  Move the    needles from hold to upper work position.  K1 row, wrap, K1 row. End COL. (RC= .)
    12. Move remaining needles into work. Knit 1 row. End COR. (RC= .)
    13. Second Wedge:  Option: Change yarn colors.
    14. Hang marker to keep count.  Zero row counter. Work steps 4b - 4i exactly as for the first wedge. 
    15. Replace steps j , k and l with the following:
    16. Do the following times.  Move   needle  to upper work position. K1 row, wrap, K1 row. COL
    17. Do the following times.  Move the    needles to upper work position.  K1 row, wrap, K1 row. COL;(RC= .)
    18. Move   remaining needles into upper work. Knit 1 row. COR. (RC= .)
  5. Repeat, step 4, beginning with step 4b,     times. (You make 2 wedges each time you repeat 4, so you will have a total of    wedges.) 
    1. As you work, you will notice the hat curving around and forming a circle.  Keep track of the  number of "wedges", but you can see spirals form at the increase lines and count also. (Remember the first cast on and bind off are the same spiral!)
  6. When you finish the last row, knit 1 row with crochet cotton or ravel cord.  Take off on waste yarn.

Make trim

Note:
This trim is required if the hat is not felted and worn knit side out; the trim reduces the tendency of the hat edge to want to curl under, toward your face. Directions for making the trim assume you will be wearing the hat with the knit side facing out.   If you plan to wear the hat purl side out,  I guess the trim is optional. (I haven't knit that, so you decide.)

The trim is definitely optional if the hat is felted.  Examine your felted swatch and decide if you think the side edges look pretty.  Notice they curl to the purl side.  Then, examine the bound off edge of the swatch; it curls to the stockinette side.   If you perfer the look of side edges,  don't add the trim.  If you prefer the  look of the  bound off edge, add the trim.  
  1. Raise =    needles.  Hang long edge of hat with purl side facing you.  (You may need to stretch the hat edge and hang weights.  Also, if you run out of needles, you can knit the trim in two piece, and seam.) 
  2. Pull needles all the way out and push hat against gate pegs; set machine to knit. 
  3. If you are right handed, place carriage on side of needle bed.  Knit   rows ending COR.   Bind off loosely.   (If you are left handed, you probably want to reverse the carriage placement. Right handed people generally find it easier to bind off right to left, and left handed people may prefer the opposite.)

Assemble

  1. beforeFeltingGraft stitches on waste yarn (this makes the hat reversible!) Otherwise, hang on machine and seam. (When I hang, I raise one less needle than for the cast on row -- because you lose a stitch when you hang a upside down first row.  If I want the hat to be worn with stockinette side facing out, I hang  the first row of the hat with the knit side facing me. I fold the hat and hang the last row with the purl side facing me.  Since the last row has one more stitch than the first row, I need to hang the extra stitch on some  needle-- pick any stitch as extra, and just hang it.  I double check all stitches are hung, pull the needles forward and push the work against the gate pegs. Then, I  pull the ravel cord-- or crochet cotton-- out, releasing the waste yarn and drop it to the floor. I'm right handed, so I place the carriage on the left and knit a row. Then I latch tool bind off from right to left. )
  2. Mattress stitch the trim neatly, taking care that the seam does not show on the purl side, which will rolls to the outside.  Run yarn through the hole in center and pull to draw shut. 
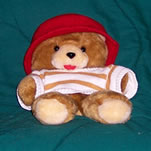
  3. If you are felting this hat, throw it in the washing machine.  Above and to the right, Teddy is modeling a hat prior to felting.  (He's modeling it after felting and pressing below.)
  4. DimensionsFind some type of suitable hat block, (I stuffed the hat with a towel) Spread the brim out and, if necessary, pin it in place as illustrated to the right.  Let the hat dry.  (If you knit this at a tight gauge, to make the hat fabric firm, pinning can be necessary because the hat is stockinette knit sideways and may want to roll in.  You want to encourage it to roll out.  If you pick a fairly loose gauge, to  make a floppy hat, you will probably not need to pin, just press the rim down.)  
  5. Tidy all loose ends, steam (if appropriate for your hat), wear.  (Felted hats can be steamed very, very hard to refine the shape as you see fit.)
.

after felt
Google
 
Web thedietdiary.com


All images, programs and text at this site are copyrighted.  Permission is given to knit sweaters and swatches from the directions provided.  @copyright 2004, Lucia Liljegren