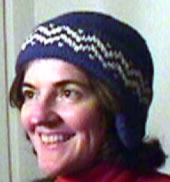
flaps

Machine Knit Ear Flap Hat

This page has a pattern generator (aka program) to create a pattern to help you knit a hat with earflaps using a knitting machine.   You can make your hat in any yarn; just enter the gauge and head size in the program, and you'll get the pattern you need.  (I am modeling the hand knit version because I made it after my MK one, and I like the fair-isle pattern I added to the hat band.)

Main siteblog (read the latest), hat collection and  Poncho & Cape collection.

Characteristics of the hat:

  • Machine knit bottom to top.
  • Double thickness over ears.
  • Cute ear flaps -- optional!
  • Optional: Stop after the band and make it a head band.
  • Simple gathered top.  (Hand knit version has shaped crown.)
  • Very easy knit on single bed.
  • Optional braids at bottom. ( I left them off.)
  • You may vary the hat size to fit any head. (For information on head size, click here. )

Remember: Like all patterns spit out by my generators, this is mostly shaping directions.  The purpose of the generators is to let you be creative, while eliminating the  need to do pesky calculations.  You might want to look at jester hats to get ideas for how to modify your hat, or color choices!

Have fun knitting and wearing your hat,
Lucia

My site is supported by your generous donations. If you use my patterns, please click and donate $3.

Find your knitting machine.


Enter Data for Your Hat

You must modify the following data to match the gauge and shape you want!  Just change the numbers; it recalculates automatically.   To design your hat you must pick a head diameter,  and a tightness factor.  You must also specify the your stitch and row gauge.

 
Replace My Gauge Swatch Information Your Gauge Swatch Information
Knit a swatch at a setting appropriate to your yarn.  You must use the same machine setting when knitting the swatch and the hat!

Tension setting used to knit your swatch. 
Stitches per inch: 
Rows per inch:

Replace My Hat Shape Parameters with Yours
 
Data to enter.
Information.
Head circumference inches.
This is a medium woman's head.  Click for size information
Tightness factor percent.  If you like a very snug hat band, enter a larger number. If you like a very loose one, enter zero.
Based on your head circumference and tightness factor, the hat band circumference will be inches around.


Results: Your Hat Pattern

Don't try to edit anything below this point. If you want to change them, change values in the table above. This is a program. So, please read through al the directions and make sure no negative numbers appear.  (I try to think about where they might appear and create a warning box, but I don't always think of them all.)

Abbreviations:

EON= every other needle. COL  = carriage on left. COR= carriage on right. RC= Row Count. 

Materials:

For an MK hat knit on a standard bed, you will need about 2 ounces of  yarn.  I used "mystery yarn"; the cone says "Mary Lu's 319" in baby pink. (This stuff knits up very nicely, but makes a somewhat thin hat.  It would be a perfect thickness for a baby hat, but you'd want something thicker for a true "outdoor-- wear at the football game in the snow-- hat". (Or, you could use 2 strands, or make a ribbed hat.)

Consult your  manual for instructions to knit short rows (partial knitting) and to use your lace carriage (if you have one.)  You will want to hang weights under the flaps and rehang them as you knit the ear flaps.
Design tip:
Consider adding stripes or fair-isle to your hat! 

Instructions:

Read about short rows in your manual. It will explain how to wrap a stitch on your machine.

  1. Set machine to tension to .  Set row counter to zero. Raise needles to work (B on a Brother), with the equal number of needles on either side of the zero needle mark.   
  2. Back side of hem: Knit to RC= .
  3. Ear Flaps:  If you want ear flaps, work two. Otherwise, just skip to the front hem.  
    1. Set machine to partial knitting (H  on a Brother.) 
    2. Move all needles to hold (E) except those from right hand needles  to  ; these are the right ear flap stitches.  Hang claw weights under needles and move as necessary while working short rows.
    3. Place carriage on right, COR. Knit 1 row.  
    4. COL. Move in work needle furthest to right from work (B) to hold (E), Knit 1 row. Wrap.  (Note: you are moving the needle on the opposite side of the carriage.)
    5. COR. Move in work needle furthest to left to from work (B) to hold (E). Knit 1 row.  Wrap needle.
    6. Repeat d and e until there are only 4 needles in work ending with COL.
    7. Now, do increasing short rows.  You will move 1 needle on the opposite side of the carriage from hold (E) to upper working position (D)  each row.  Continue until all ear flap stitches are in work, ending with COR.
    8. Break yarn, work a second ear flap on the same needles numbers but on the left side of zero, using the same procedure as for the right earflap.
  4. DesignAknit Pro Version 7.0 Professional Electronic Knitting MachineDesign Software Requires Special Cable(s) for Your Knitting Machine Front of hem: Option: You can add a fair-isle pattern here.   The hat I am modeling has a fair-isle pattern centered on the front hem. (Click the Design-a-Knit image to the right to learn about a programsto help you incorporate these into your knitting.)
    1. Reset RC to 0. Place carriage on right. COR.  Set machine to N so all needles work. Knit to RC = ;
    2. Hang hem bars every other needle. (If you want a head band, bind off here.)
  5. Hat body:
    1. Option: If you like, knit the hat body in fair isle.
    2. Knit to RC   
  6. Push EON to upper work position (D); pass lace carriage left to right  to transfer stitch on every other needle to next needle. (Or if you have no lace carriage, transfer every other stitch stitch to the adjacent needle.) Push empty needles out of work (A on a Brother); knit three rows.   Set machine tension to highest possible, knit one row.
  7. Finish: Cut yarn leaving a long tail and thread double eyelet tool; remove stitches onto tail; don't tighten yet. Seam back of hat and then pull yarn tail tight to close up top of hat. Cut 1 yd long pieces of yarn, thread through ends of ear flaps and braid.  Make a knot in the end to anchor.  If you like pom-pom's  make a big one and add it to the top of the hat.  Tidy up, steam hat and wear. 
.