Navigate my site!
HOME of my siteMy Blog
Email Lucia
|
My site is supported by your annual $3 donation. Please click.
|
|
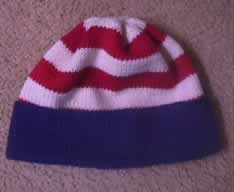
Ski Hat
Imitate and knit mine, or design your own!
From The Knitting Fiend
Sept. 30, 2001
The
days are getting cold in Illinois. I needed a warm hat. A site
visitor asked for a patriotic one. So, here's my hat which can be
knit by hand or machine; I knit this one by hand. I knit back and forth,
but if you wish to knit circular, eliminate the two seam stitches
(i.e. the edge stitches) and just knit circular.
Ok, so you are saying to yourself. "The hat shape is ok, but.....
I'm Canadian *, what do I want a red, white and blue hat for?
I'll just keep surfing.... "
Well, DON'T leave yet. You can make the hat you want. Just keep
reading! You can use any yarn you like and recalculate the rows and stitches
using this page.
Good luck.
Lucia
|
Stitch Patterns
Officially, this hat will use four stitch patterns. It seems
like three because two of the patterns happen to be identical. Later,
if you love the shape of the hat, but want to design your own, you can
choose your own stitch patterns for patterns 1, 2 and 4. Stitch pattern
3 is used to make sure the fold is crisp; it should be stockinet.
(Guess what? Picking your own stitch pattern is called..... designing
your own hat. Wow! If you do make one, send me a picture.
Heck, if you imitate my hat, send me a picture!)
One important point: All stitch patterns must achieve the same stitch
gauge. Different row gauges are permissible. It's pretty easy
to match the stitch gauges. Use similar weight yarns throughout the
hat, and limit your design to fair isle or stockinet. Those knitting
with machines may find the row gauge differs for stockinet and fair isle.
That's ok.
These are the stitch patterns used in my hat. The knitting directions
for each are for flat knitting (not knitting in the round). When
you design, write down your own instructions for St. Pats. 1-4.
Stitch Pattern 1: 2 x 2 rib. Cast on
a multiple of 4 stitches + 2 extra stitches. Knit in blue.
Row 1: *K2, P2* repeat until last stitch K2.
Row 2: Knit stitches "as they present themselves". (This means knit
the knit stitches and purl the purl stitches, or P2, *K2, P2* repeat to
the end.)
Row 3: Repeat Rows 1 and Row 2.
Design tip: This is a "welt". If you substitute, pick a non-curling
stitch, (e.g. ribbing, garter stitch.) This should be the same yarn
type and weight used for stitch pattern 2 and 3. |
Stitch pattern 2: Stockinet in blue.
Row 1: Knit all stitches.
Row 2: Purl all stitches.
Design tip: You can go wild here! Or you can pick a boring
stitch like I did. For your first design, pick a stitch with a small
pattern repeat. Otherwise, you will get a noticeable pattern
discontinuity at the seam. There will be no discontinuity if the
stitch pattern is a multiple of 4!
Also, use the same yarn type and weight for stitch pattern 1, 2 and
3. |
Stitch pattern 3: Stockinet in blue.
Row 1: Knit all stitches.
Row 2: Purl all stitches. (This is also knitting stitches "as they
present themselves!")
Design tip: For your first design, substitute color but not stitch.
Also, pick the same yarn type used for stitch pattern 1. You'll see
that this stitch forms a "buffer" near the fold. |
Stitch pattern 4: Stockinet in red and white
stripes.
Row 1: Knit all stitches.
Row 2: Purl all stitches.
Design tip: See tip for stitch pattern 2! You can use a slightly
different weight yarn for stitch pattern 4. |
Yarn Choice:
I used about 4 oz of worsted weight hand washable wool distributed as follows:
about 2 oz blue, about 2 oz red and about 2 oz white. (Ahem, 2+2+2=
4? Not on my planet! The whole hat weighs around 4 oz. But
my kitchen scale isn't very accurate! So, I round each individual
amount up!)
You can use any worsted weight, double knitting, or sport weight yarn.
I'd avoid chunky yarn for this design for two reasons: The
hat would probably be too hot; wearing this hat is like wearing a
hat
and
a head band! Also, if the yarn gauge is too large,
the hat probably won't match your head size well. There just too
much rounding when I make the number of stitches a multiple of 4.
Oh! Beginners: Don't fret if you don't match the gauge on the
yarn label exactly; don't worry if you don't match my gauge. The
yarn I bought recommended a gauge of 5 st/in. I knit at a gauge of
4.76 st/in. I liked the way the yarn looked, so I decided that was
fin. The whole purpose of this calculator is to free you from patterns
written to an exact gauge. Decide if you like your fabric, and type
your own gauge into the boxes. Everything will be just fine.
Finally: THE ACTUAL PATTERN
Yarn & Tools required:
-
About 2 oz. each of red, white and blue yarn. I used worsted weight.
-
Two knitting needles or a knitting machine. I hand knit using 4 mm
and 3 mm needles.
-
Tapestry needle.
-
Scissors.
-
Tape measure.
Note:
-
Special instructions for Machine Knitting will be listed after the abbreviationMK.
You must know how to use your machine. I do not provide machine settings.
-
Special instructions for hand knitting will be listed after HK.
|
How to Create your Pattern.
To create your pattern, you must:
- Make 3 swatches, one for stitch pattern 1 (here: blue stockinet),
one for stitch pattern 2 (here: red and white stripe stockinet.) and one
for stitch pattern 3 (here: blue stockinet.) Note: If you are not varying
yarn types and are sure all patterns will have the same gauge, you can
get away with making 1 swatch! That's what I did.
- Measure and calculate your stitch and row gauges.
- Type YOUR stitch and row gauge data into the form.
-
Measure the hat wearer's head. (No, don't email me and ask me how
big their head is. Would you email me and ask me their shoe size?
You click here for information. )
-
Type YOUR head circumference into the form below.
-
Type other design parameter you chose into the form. (Hint: if you type
a really small number for the hat length, the form will replace your choice
with the smallest reasonable hat length for a wearer with a given head
circumference. If you want to make the hat longer, the form will
let you. You'll need more yarn, but a long hat does look cute.)
-
This page will perform all calculations required for your hat.
|
.
Assemble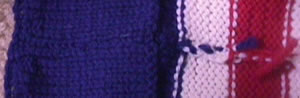
-
If you used wool, lay flat and steam hard but don't flatten the "purl"
row used to mark the turn. If you used acrylic, steam gently (and test
on the swatch first!!!)
-
Fold up along purl row. Steam hard again this time making sure the
fold is nice and crisp.
-
Fold hat and stitch seam from the top of the hat to the beginning
of the red & white stripe pattern. The ugly part of the seam should
face inside. Make sure the seam looks nice on the outside of the
hat. See seam detail to right. Notice the red and white part
of the seam is on the purl side.
-
Mattress stitch brim and the few blue rows after the turn row. This
time, make sure the ugly side of the seam doesn't show on the outside when
the brim is folded up. See seam detail to right. Notice the the seam
is attractive on the knit side.
-
Tidy up all loose ends of yarn.
-
Pull to form top of cap. Tidy up and secure the tail.
-
If you feel like it, steam again!
Wear Hat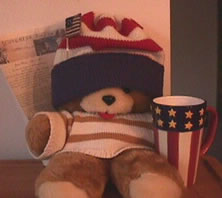
Jim's fishing again! So, he couldn't take my picture. Teddy
is modeling for me. Teddy's head circumference is 3" smaller and
a lot shorter than mine. That's why the hat is drooping down. Can
you believe it, Teddy wants to keep the hat? And he's nagging me
for a matching sweater!
I'll post a picture of me in two days; then you'll see how it looks
when it fits!
What have you learned?
-
Did you design your own hat? Then you taught yourself how to modify
the stitch pattern element of a design.
-
How to make a nice turn row for a brim.
-
How easy it is to make a hat.
Knit like a fiend!
Lucia
Abbreviations
RC = Row count. T = Tension setting. N= needle size. WY = Waste Yarn.
St = stitch.
Copyright, Lucia Liljegren. The Knitting Fiend. 2001.