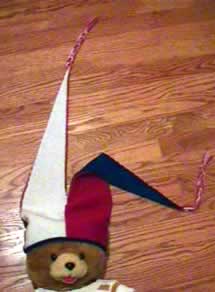
teddy 

Court Jester Hat

 This page has a pattern generator (aka program) to create a pattern to help you knit a court jester hat using a knitting machine.    

You can make your hat in any yarn; just enter the gauge and head size in the program, and you'll get the pattern you need.

Main siteblog (read the latest)ski hat, raspberry beret,  crocheted tam, hat collection and  Poncho & Cape collection.

You must set your browser to run javascript and to accept cookies to run this program.   With some browsers, the address bar should also read "http://www.thedietdiary" at the beginning. If the www's aren't there, stick them in!


Characteristics of the hat:

  • Knit sideways using short rows.
  • Roll edge hem.
  • You may vary the hat size to fit any head.
  • You may vary the length of the points from fairly short to as long as you like.

Remember: Like all patterns spit out by my generators, this is mostly shaping directions.  The purpose of the generators is to let you be creative, while eliminating the  need to do pesky calculations.  You might want to look at jester hats to get ideas for how to modify your hat, or color choices!

Lucia

Google
 
Web thedietdiary.com


Patterns are worth something. Custom patterns should be worth even more.  This is sort of "shareware".   If you knit one of these, please send me a $3 donation.  (Pictures are welcome too!)


Enter Data for Your Hat

You must modify the following data to match the gauge and shape you want!  Just change the numbers; it recalculates automatically. 

 
Replace My Gauge Swatch Information Your Gauge Swatch Information
Note your machine setting on your directions in pen.  You must use the same machine setting when knitting the swatch and the hat!
If you plan to felt your hat, felt the swatch and enter the gauge after felting.  The hat will be too big, but will shrink in the wash.

Stitches per inch: 
Rows per inch:

Replace My Hat Shape Parameters with Yours
Remember to click on the page or hit your tab  key after entering your final value to force calculation!
 
Data to enter.
Information.
Hat circumference  you want:
inches.
Jester hats should be a little tight.  My value is for small man's head.  Men's heads are 1-2" bigger.  Kids are 2-3" smaller.  It's best to measure heads. They vary a lot.
Hat length inches.
Note: There is a minimum length that can be knit. The program won't let you make it too short.


Results: Your Hat Pattern

Don't try to edit anything below this point.  If you want to change them, change values in the table above.  This is a program; so, please read through al the directions and make sure no negative numbers appear.  (I try to think about where they might appear and create a warning box, but I don't always think of them all.)

Yarn Estimate:

This depends on your yarn. Hats rarely take more than 4 ounces.


Knitting Instructions.

Some abbreviations: RC = Row count read out.  COR= Carriage on Right. COL = Carriage on Left.  Hand knitters, scroll down for HK notes.

Main Hat Piece.

Read about knitting short (partial) rows.  Design note: You can make the jester hat multicolored by changing colors at  the beginning of the "wedge" and the middle of the "wedge".  The place to change colors is before step 4a, and one row before the row indicated in step 4f.  (For the color change during step 4f, the carriage will be on the right. The other color change may happen on the left or right depending on the exact size of your hat and your row gauge.)

 For Jim's hat, I knit  "red-white-red-blue".   That makes the jester hat be red and blue on the back and red and white on the front.  If you are changing colors, note your color changes in pencil. Everyone will want to do something different.
  1. Raise  needles to work position (B on a Brother). ( If possible, raise     just to the right hand side of zero, I will refer to these as the "right hand" needles  Count over the number and note the needle number and of the right hand needle that is furthest to the left and note that:   R= __________.   (Recording the number helps when you notice when you are nearly finished taking needles out of work when working short rows. The jester points are formed on the right hand needles; the  hat brim is to the left.)
  2. Cast on with waste yarn.  Knit a few rows. 
    1. Thread machine with ravel cord or crochet cotton. Move the "right hand" needles out of work and set the machine to partial knitting. Knit 1 row, break or leave a long tail.  Move the "right hand needles" back into work, and more the "left hand" needles into work.  Knit 1 row with ravel cord or crochet cotton.  (The purpose of this is to have a "broken" row that is easy to pull out later when you sew things up.  This is very useful if you assemble at the machine.)
  3. Thread machine with fashion yarn, and set to your chosen machine tension.
  4. You will work short rows to shape the jester points. Each wedge makes 1 point.
    1. Set row counter to zero. RC=0. Set machine to normal knitting (N) on Brother. (On later repeats, needles in upper working position will knit when you  make the carriage pass).
    2. Place carriage on and thread with color you like.
    3. Knit  rows. End COL
    4. Set machine to partial knitting (Hold on a Brother.)
    5. Move    needles on right from work (B) to hold position (E).  K1 row, wrap a needle. K1 row. End COL.
    6. Repeat "e"  until you have moved     needles on the right into hold position and made the carriage passes.   You should end when  RC=     (You are 1 row past the center of the short row wedge. )
    7. Now mirror shaping by moving needles in hold (E) to  upper working position (D) work at the same rate you moved them out of work in step e.  When you are done, RC=  ;
    8. If necessary, knit one more row to end with  . (This should match the location of the carriage in step "b")
    9. Hang weights under the right hand needles when you do the following:
      • Move left side needles to hold position (E) leaving only the     right hand needles in work (B).   Thread machine with crochet cotton or ravel cord.  Knit 1 row. Break leaving a long tail so you can pull this out later.  Thread machine with waste yarn.  Knit 4 rows.  Thread with ravel cord or crochet cotton again.  Knit 1 row, break leaving a long tail again.   (You will remove this waste yarn and ravel cord later.  These live stitches will be grafted to make a jester point.) 
  5. Thread  carriage with hat yarn in the color you want  and repeat step 4,     times. (This makes    wedges.)
  6. Repeat step 2a. (This leaves ravel cord near the bind off.)
  7. Take off on waste yarn.

Make Roll Brim.

Note: I knit this in dark blue. 
  1. Raise  needles.  With purl side facing you, hang edge that was on left side of machine on hat.  Set machine tension to one setting tighter than for hat.  (This should be a lower number on  most machines.)  Knit    rows.  Bind off.

Assemble

  1. Hang weights as necessary as you do this step.   Raise the number of needles you used for cast on.   Hang the cast on edge with the knit side facing you.  The two jester points will look like one point on the left side of the machine.  Look down and to the left.  You will see stitches on ravel cord in the center of a big point on the left.  Fold the fabric and hang the live stitches above the ravel cord to close jester point on the left hand needles. You will be grabbing the bars between actual stitches when hanging. (It's a pain in the neck to hang the ones furthest to the left, but you should be able to get your 1 prong tool through two stitches and do it. )  Then, hang the "left hand" stitches of the bind off on the right side. (You are making the back seam and seaming 1 wedge.  This should fill the needles.  )
  2. Take waste yarn off stitches that have been hung, but leave waste yarn attached to stitches that have not been hung.  You can do this by pulling the ravel cord (or crochet cotton) you knit in step 2a and/or 4i.   It is is especially important to remove the front waste yarn from the location where the wedge seam ends and the back seam begins. Otherwise the carriage will probably jam when you do the next step.  (I'm not sure you really need to remove the rest. Use your judgment based on your experience knitting over fabric with waste yarn on it!)
  3. If you are right handed, place the carriage on the left.  Set machine to the highest numbers (loosest) tension setting.  Thread carriage with hat yarn.  Pull needles out to force them to knit, push work against gate pegs and move the carriage across carefully.  Bind off.
  4. The back seam and one point are formed.
  5. Pull out needles to hang "right hand" stitches for the sides of the other jester point.  Hang one side of the wedge point with knit side facing you. Then hang the other portion with purl side facing you.  You can pull the ravel cord and remove the waste yarn if you want to, but it doesn't matter that much. (I didn't remove it, and the carriage didn't jam.)
  6. Put carriage on left.  Thread carriage, knit 1 row, bind off. 
  7. Take off any remaining waste yarn.  Sew the tiny seam on the roll brim. 
  8. To make braids, cut 12 long, long strips of yarn.  Pull the yarn through the tip of a jester point using a crochet hook, and pull long ends through the loop to anchor. Braid like a girls braid, tie a knot in the end.  Repeat for second point. Trim.  (Or if you like, make pom-poms!)
  9. Tidy all loose ends, steam, wear.
.


Google
 
Web thedietdiary.com

General Instructions Hand knitting:

Each needle represents a stitch. So, cast on the number of stitches indicated in step 1.  You have at least two options. Either: a) work a provisional cast on-- to have live stitches, but you can also b) just cast on using your favorite, non-provisional method.  

Ignore obvious machine knit information like "COL", "COR" or RC. However, do change yarn colors when you'd like to change it! (I suggest the beginning of wedges and half way through.)  However, use smaller diameter needles when the instructions say to use a tighter tension, and use larger diameter needles when it says to use the looser tension.  (You will need two needle diameters, long enough to hold the hat stitches. But you knew that, right?  )

Work the short row shaping as discussed for the machine knit (MK) instructions. When you knit the first short row, place a stitch marker between the  "left" and "right" hand stitches.  You'll be done decreasing when you are no longer working any stitches on the "right hand" side of the stitch marker. You won't have to count rows or stitches!

Work the increasing portion of the short rows as decribed in the MK instructions.   When you are done with the increases, and have knit the 1 or 2 additional required rows, you need to do something to split the hat points. You have two choices: a) If you did a provisional cast on-- as in "a" before, use a three needle bind off to seam what I call the "right hand" stitches to the corresponding "right hand" stitches on the cast on edge. (Then the first wedge will be formed and seamed! The back seam stitches should still be on a piece of yarn.) or b) just bind off the "right hand" stitches.  You can seam them later.

Next cast on number of stitches you bound off  to create the stitches you need the next wedge. Use whichever cast on method you used the first time!

Now work the next wedge, shaping as discussed for the first wedge-point.  When you reach the end, a) Do a three needle bind off to seam final edge to the cast on and wedge edge or  b) bind off and then seam the back and the wedges.  Tidy up, make braids, etc.

If you don't know how to hand knit short rows, or do a provisional cast on, I suggest entering short rows and/or provisional cast on in the google search box.  You'll find directions.


All images, programs and text at this site are copyrighted.  Permission is given to knit sweaters and swatches from the directions provided.  @copyright 2004, Lucia Liljegren