ponchoPoncho IV: "Two Rectangle"

Main site,   other Ponchos

This page describes the overall construction of "poncho IV".  Visit the poncho IV generator to create your pattern.

I'm asking for $3 donations from people who actually use the generator and make themselves a poncho.  Thanks for your generosity!


Poncho Construction (Theory)

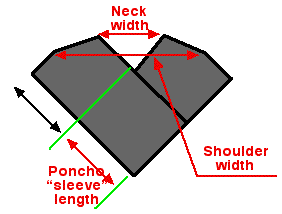
schematicTo better understand the knitting directions, please examine the schematic to the right, which shows the poncho after the first two pieces are knit and the second rectangle has been attached to the first.  (This discussion will ignore application of the Idiot cord.)

I illustrated the first rectangle with grey stripes in the schematics; the second  rectangle, which is shown with purple stripes.   If you change yarn ever few rows, you could make a striped poncho, and the stripes would run  as illustrated. (My poncho is not striped.) 

First, examine the grey striped rectangle.  The instructions have you cast on along the lower right hand side of the "Big Square".  You then knit the big square and hang markers.  You then continue knitting toward the neck, eventually reaching the optional dart, which is indicated by a dark triangle.   You will knit the dart, and then continue to the end of the piece, taking the knitting off on waste yarn. (Hand knitters can just bind off.)

At this point, you will have finished the first rectangle.  You then make a second identical rectangle. 

theory
Once you have both rectangles complete, you will seam one rectangle to the other,  seaming one of the edges on waste yarn to the edge of the "Big Square".  The poncho will form a 90 degree angle and look sort of like the schematic above. Then, fold the poncho at the two shoulder lines, and attach the other end, matching "A1" to "A2" and "B1"to "B2".    After you seam, the poncho will look like the one pictures at left.  The dots indicate  locations where you were told to hang markers.

Once the poncho is assembled, you can work a neck treatment on the back neck only.   This helps keep the poncho from shifting forward. (When you wear your poncho, you can look around and notice other people ponchos pitch forward, so their front hem hangs lower than the back. You can congratulate yourself for using my poncho generator instead of some over simplified thing. You are also permitted to scoff at anyone whose poncho rides up or bags funny around their neck.)

After assembling the poncho, you can finish any unfinished edges. (My  poncho has I -Cord attached. You can obviously substitute something else, but you'll then need to skip the I-Cord aspect of the directions.)

What are the Darts For?

At this point, eveyrone who has seen other versions of this poncho realizes they usually dont have shoulder darts.  What are they for?  The purpose of the darts is to prevent the poncho from forming a cone and  bunching at your neck.  If you examine the schematic of the poncho, you'll see the shoulders are almost horizontal. That's due to the darts. (Yours may not end up quite this  horizontal. The exact angle will depend on the ratio of you stitch to row gauge.)

The short row darts are optional. I recommend working them if:
I recommend skipping the short row darts if:

You may want to stop and plan ahead for the hem trim. I prefer to make it at the end, so I can inspect the balance and remove the trim if necessary.  If you HK, it is best to use an "invisible cast on" at the hem if you wish to achieve the illusion of having cast on and knit the trim right form the start.  However, it looks fine if you use any old cast on, pick up stitches and knit the trim.


All images, programs and text at this site are copyrighted.  Permission is given to knit sweaters and swatches from the directions provided.  @copyright 2004, Lucia Liljegren