ponchoPoncho IV: "Two Rectangle"

This page has a pattern generator (aka program) to create a poncho pattern for you.  You can make your poncho shorter or longer, use yarn like mine, or use heavier yarn.   The generator will spit out the pattern you  want.

Main siteblogPoncho collection,  off-site poncho links

You must set your browser to run javascript and to accept cookies to run this program.

Type: Knit as two rectangles (with optional shoulder darts).

Characteristics of the poncho on this page:

  • is knit as two rectangles with shaping at the shoulders.
  • is worn with a point down the front. 
  • can be hand knit or machine knit in any gauge.  However, the directions are worded for machine knitters, as I give row counts instead of lengths from cast on.  Hand knitters will want to read the notes which provide information to convert the pattern to HK terminology.
  • has optional darts near the shoulders to prevent the "neck cone" or "bump" you see in traditional ponchos. 
  • if you knit the optional darts, you must choose stitch that permits you to work short rows.  (Short rows are  nearly always possible when hand knitting.  On my Passap, they are very difficult to work if I choose tuck stitch.)
  • you need to know  how to operate your knitting machine or how to hand knit.
  • an optional little "V" to fill in the back  neck so the poncho doesn't slide forward.
  • The generator estimates how much yarn you need if you knit the poncho in stockinette.  

Remember: Like all patterns spit out by my generators, this is mostly shapingdirections.  The purpose of the generators is to let you be creative, while eliminating the  need to do pesky calculations.  Depending on the generator, you may get a lot of design information which you may  ignore or figure out depending on your personality.  You can always  just imitate the poncho
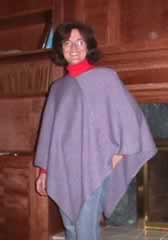
 picture!

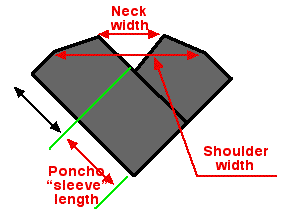
In any case, with this poncho, you decide how long you want your poncho,  how wide you want the neck and how wide your shoulder are. That's it.  You pick your yarn, needles etc.  I sometimes make some suggestions; but they won't be detailed.

Lucia


Design your poncho!

two piecesYou will need to design your poncho.  You must pick a neck width, a "sleeve length" (which actually includes the sleeve and shoulder on the poncho), a shoulder width and specify the stitch and row gauge for your yarn.  That's it! 

To understand these dimension, examine the schematic to the right, which illustrates the basic poncho shape. (You can add a neck treatment later; that's not shown in this illustration.)  To make sure you don't accidentally make a poncho with a neck opening that is too small for your head,  the program will calculate two possible sizes of the head opening for you. ( The larger head opening is for the simplest possible neck treatment. The smaller one will correspond to the neck treatment I'm  planning to make.)

For my poncho, I specified:
My poncho took about 16 oz of fingering weight yarn, knit at 6.7 st/inch. 

I tell you what I did at the neck, but everyone will wants to do something different.  You can examine other ponchos at this site to see what you might do.   Have fun knitting the poncho,
Lucia

Begging!

You can run the calculator for free today. I'll update to make people pay someday.....  Meanwhile, I'm asking for donations.     Please click the to make a $3 donation. 


Enter Data for Your Poncho

You must modify the following data to match the gauge and shape you want!  Just change the numbers, and then  make sure you either tab out of the box, or click outside the box  when you are finished.  (You can confirm things are working if you change the neck width and notice the values on the right change when you change the box on the left.)

Looking at the schematics may help you understand some of the values; to see generic schematics of this poncho, click schematics.


Replace My Gauge Swatch Information your Gauge Swatch Information
Note  any machine setting by hand.  You must use the same machine setting when knitting the swatch and the poncho!

Stitches per inch: 
Rows per inch:

Replace My Poncho Shape Parameters with Yours
Click these if you need help with sizes: adult sizes, child sizes.  
Neck width
inches
You need to get your head through this hole. You can probably get your head through a hole 10% smaller than you head. Before adding any neck treatment, the head opening will be inches.  If you use my neck treatment, the actual head opening will be inches.
 
The front neck depth  is inches.  
Your approximate shoulder width: inches. You should measure your shoulder width over clothes.  My shoulder width is about 14.5", but I would need 15" or even 16" to wear over bulky clothes.  Click the size charts above and look at the shoulder widths if you don't know yours.

Note: If you don't want shoulder darts, enter the neck opening width you'd like above, then set the shoulder width equal to that. Then, just don't worry about the shoulder width any further.  When knitting, just skip the directions for the shoulder darts.

If the following box tells you to fix your entry, make sure the neck width you entered is no larger than the shoulder width you entered. 

"sleeve" length.  inches
This is the measurement that dictates whether the poncho is long or short.  Mine is nearly wrist length on my, and I'm about 5'4".  You can make thie  poncho quite short.  But, if you make it shorter than the half the shoulder width, do scroll down and make sure the patter doesn't contain any negative numbers!


Results: Your Poncho Pattern

Don't try to edit anything below this point.  If you want to change them, change values in the table above. The summary tables are for informational purposes only.   This is a program. So, please read through al the directions and make sure no negative numbers appear.  (I try to think about where they might appear and creat a warning box, but I don't always think of them all.)

Yarn Estimate

(Warning: Oct. 22:  I'm taking the poncho to the post office to weigh it.  I should have a better estimate tomorrow.  Right now, all I know is that I have a teeny tiny amount of yarn left on the cone.  But...  for all I know, I'd already used a bit on some previous project.  So, I may be over estimating yarn needs.)

Here's how much yarn I think you will need: Your yarn stitches are about    times as large as mine and your poncho is    times the area of mine.   I used 16 ounces of JaggerSpun Heather in 2/8 weight, which I knit in stockinette.    If you knit yours in stockinette, using a 2/8 wool yarn, and knit to about the same "hand" as I do,  you will probably need:   ounces of yarn.   However, since you might not knit to the same "hand", you may use a different fiber spun differently etc.,  it is best to estimate by yardage; I used    yards; I estimate you need    yards.   (I advise estimating based both on yardage and weight and buying the larger amount. If you get too much yarn, knit a beret or hat.)

You will need more yarn if you knit the poncho in any thick or fluffy stitch like garter stitch, ribbing, any double bed stitch or a machine knit tuck stitch. You will need less yarn if you knit the poncho is a stitch with holes in it, like lace. 

Poncho Construction: Please read.

Click and read the poncho construction page before proceeding.

Some abbreviations: RC = Row count read out.  COR= Carriage on Right. COL = Carriage on Left.

Make idiot cord for first panel.

Warning: Don't pull the I- cord. It's easier to hang if you don't.
You will be instructed to hang row markers. I advise using two or three different color markers and alternating.  Note which colors you hung at which point.
  1. Set machine one tension setting tighter tension than you will use for the poncho.  Cast on over 5 stitches in waste yarn.  Knit a few rows.  Hang a light weight. 
  2. Set machine so it knits in one direction only.  (I push in one part button on my Brother. I set CX on my Passap and knit on one bed only. Change to poncho yarn. Knit 10 rows.   (You will unravel these and throw them away. They just help if you miscount when rehanging.)
  3. Notice the trim will start to form a little tube with some bars along the back.  To make it even easier to avoid twisting the I cord when you attach it to the poncho I-cord later on,  use a tapestry needle to periodically draw some colored yarn through the horizontal bars as you knit the I-cord.  You will pull this out later. (Click to see.)
  4. Set row counter to zero.  Set a row marker #0 R.  (This will end up aligned with the waste yarn.)
  5. Knit until row counter reads RC=  set a row marker #1L.   Set row counter to zero. (You could also hang a marker when you are 1/2 done knitting this bit of I-cord.   The extra marker meet the row corresponding to the center of the dart, but will fall on the hem side of the poncho.)
  6.  Knit until row counter reads RC= ; set a row marker #2L.  Set row counter to zero. This will end up on the right hand edge of the cast on.  
  7. Knit until row counter reads  RC=; set row marker #3.  This will end up in the center of the hem.
  8. Knit until row counter reads RC= ; set a row marker #2R.  Set row counter to zero. (This will end up on the left hand edge of the cast on.)
  9. Knit until row counter reads RC=  set a row marker #1R Set row counter to zero. 
  10. Knit until row counter reads RC= .  Set a row marker #0R.  .  This will end up aligned with the waste yarn.  (You could also hang a marker when you are 1/2 done knitting this bit of I-cord.   The extra marker match up with the marker you hang at the shoulder dart.)
  11. Knit 10 more rows to be safe.   You'll unravel these at the end.
  12. Change to waste yarn, knit a few more rows. Break yarn, remove cord from machine. Anchor live loops with a safety pin or a piece of yarn. (You'll unravel later.)
  13. When you hang I cord, you usually want to hang one loop from the side of a stitch next to the column of bars.   From now on, when I refer to a row of I cord, I  mean one knitted row. If I'm sloppy, I may also say one "stitch" or one "loop".  (Yep, I may use different terms for the same thing.) For reference:  It took two carriage passes to knit 1 row of I cord.  The other pass made that little column of bars.  The column should be "below" the needles. 

Knit Poncho Rectangle 1

Skill: You need to know how to work short rows. Consult your manual; it may be called "partial knitting". 
Note: The direction wording assumes you are knitting stockinette and the knit side will be the "public" side of the garment. The purl side is the "wrong" side.  This matters when you are rehanging pieces and assembling on the machine.
  1. Raise needles plus two extra. Hang idiot cord between markers 1R and 1L placing 1R on the far right hand needle, and 1L on the far left.  Place marker 3 in the center.  You will be hanging 1 row of I-Cord per needle.  When finished, transfer edge most  I -cord row in one and lower the two edge needles.  (You have two hung on the edges.)
  2. Thread with poncho yarn, set machine to tension for your poncho.  Begin COR.  Set row counter to RC=0.  Move carriage across slowly.
  3. Knit until row count is RC= rows. (COR)  (You have finished knitting "big square" outlined in green on the schematic.  If you like, hang row markers on either side when you reach the center row. That helps when you rehang later.)
  4. Hang a rows marker on the edges. (The right hand edge is the neck edge.   You will later hang this edge edge between this marker and the hem. )
  5. Knit until  the row count reads RC= rows. (COR)
  6. You have reached the optional shoulder dart.  If you are skipping the darts, do set a row marker to help you when you apply the neck treatment.  If you knit the dart, notice the warning boxes which may instruct you to skip a particular letter in the instructions. If they do, skip to the next lettered step in the directions.
    1. Set row counter to zero. (RC=0) Set machine for partial knitting (short rows.)  I advice hanging weights near the far right hand side of the machine..
    2. Row 1: Knit 1 row.
    3. Row 2: Move    needles  at the far right hand side of the needle bed to non-working position. Knit 1 row, wrap needle.
    4. Row 3 Knit 1 row.
    5. Row 4: Move 2 needles at the right  hand side of the needle bed to non-working position. Knit 1 row, wrap needle.
    6. Repeat rows 1-4 until   needles have been taken out of work, ending on an even row. (RC= ;  COR). Note: This is a [   , 2] pattern for moving needles. You are removing    stitches from work every 4 rows.)
    7. Next two rows and possibly more: 
      • Knit 1 row.
      • Move 5 needles at the far right hand side of the needle bed to non-working position. Knit 1 row, wrap needle. 
      • Repeat  until you have done this a total of times and total of needles have been taken out or work. (RC= ; COR.  Note: This is a [5,5, .... ] pattern for moving needles.  The purpose is to smooth out the transition from the shoulder to the "sleeve" of the poncho. Otherwise, there is sort of a kink.)
    8. --------- Center of dart. (Shoulder /fold line. ) Set a row marker.
    9. Set row counter to zero. RC=0.
    10.   Next two rows, and possibly more.
      • Row 1: Knit 1 row.
      • Row 2: Move the 5 out of work needle closest to the needles in work back into work. Knit 1 row.
      • Repeat rows 1 & 2  until you have done it a total of times.  (RC= ; COR. Note: This is a [5,5, ....] pattern.)
    11. Continue moving needles into work on even numbered rows, but at this point,  move them in at the rate you followed when you first began the dart-- to mirror the rate you moved them out of work during the first part of the dart shaping as described during step "f". All needles should be in work when you reach RC= ; end COR.
    12. Examine the work, you should see a sort of "pocket" has formed on the right hand side of the machine.
  7. Set row counter to zero.  Knit until row count is RC= Rows. 
  8. Change to waste yarn, knit a few rows. Take off on waste yarn.  (Hand knitters can just bind off.)
  9. First "rectangle" mostly done.

Partially attach I-Cord

The I-cord is dangling now. If you like, you can sew up I cord for the hem edge at this point.  This is the edge without the shoulder dart. When attaching the I cord, match marker 1L and 2L to the appropriate points, and either mattress stitch, link or attach on the machine. 

I attached my I cord on the knitting machine.  I needed to attach more I-cord stitches than I had machine needles. So, I attached in two major steps.  First,  I raised (the number of needles I hung for the cast on), hung the poncho between the cast on and the first marker with the knit side facing me.  I made sure the neck dart was hanging toward the floor.  (This hangs the side of "the big square".  I then hung two loops from the I-Cord in the needle by the cast on, and then 1 loop of I-Cord per needle.   I placed the carriage on the left (because I am right handed), set it to knit, and  moved the carriage across the needle bed.  Then, I latchtool bound off from right to left.  I then raise   needles and hung the remaining edge up to the waste yarn and attached the I cord with 1 loop per needle. (If you knit those extra "just in case" I cord rows, there should be a few extra after the "0" marker.) 


Machine knitters with linkers will want to use their linker.  Those who like mattress stitch can mattress stitch the I-Cord.  Hand knitters will want to learn how to knit I cord directly on the edge. 

At this point, there is still some I-Cord dangling on the neck side. Just set the piece aside.

Knit Rectangle 2

    Knit exactly as rectangle 1.

Assemble two rectangles.

  1. Raise needles.    With knit side facing you, hang the edge of second rectangle between points A2 and B2 and hem on the machine. With purl side facing you, hang the live stitches on waste yarn between points A1 and B1 on the machine,  matching points A's and Bs. Be sure you hang the 1/2 stitches under the edge stitches.  You  may need to double up a stitch.  Important: The two knit sides face each other. 
  2.  I always remove the waste yarn at this point, and pull down to make sure I really hung all the stitches. I hang light weights too.  I'm not sure if either step is necessary.
  3. Manually pull loops of top piece through back piece. (I don't think this is necessary, but I like the nice crisp seam I get this way.) 
  4. If you are right handed, place carriage on left, thread, and knit through loops.  Latch tool bind off from right to left.  (If you are left handed, you might prefer to place the carriage on the right, and then bind off from left to right.)
  5. Now, hang attach the remaining I-cords to the neck edges.  If you do this on the machine, you will need to raise   needles to hang the I- Cord 1 loop per needle.  After attaching the I-Cord, hand  sew the final edge underneath the other bar of I-Cord to make the neck look nice. Unravel any extra I -Cord, and draw a thread throw the live stitches to keep them from unraveling
  6. Tidy up all loose ends, take off any waste yarn and markers add an edge treatment to the hem, steam (if steaming is appropriate for your yarn) and wear. ( For reference, I'm going to work a round of crochet around the edge. )
Strictly speaking your poncho is finished.   However, I like to fill the back neck so the poncho doesn't slide forward.   You can do this too.

Lucia's "V" fill neck treatment.

I want a poncho that keeps the back of my neck warm.  So, I fill in the back of the neck with a triangle of fabric.  To imitate my neck treatment, follow the long directions below. 
  1. Cast on over 5 stitches in waste yarn, set machine to knit in one directions only.  Knit a few rows.
  2. Thread with poncho yarn.  You are going to knit I cord.  Knit a few rows. Hang a marker.  Knit to RC=   , hanging a marker when you have knit 1/2 the required rows.  Hang another marker.   Knit a few more rows "just in case", and to give yourself some I -Cord to lap under when sewing up.
  3. Take off on waste yarn.
  4.  Raise needles with half the needles on either side of '0'.  ( That is,    needles on either side of '0'.)
  5. Hang I-Cord, placing the marker between the '0' needles, and hanging 1 loop per needle.  Even if you forgot to knit the "justin case" rows, you should have two extra loops on each side of the bed. You'll be tacking these down when sewing together later, and you may unravel them. (They were just in case you didn't hang the center of the I -Cord in the center of the bed!)
  6. Knit 1 row.  The Carriage is now on the left (COL)
  7. Row 1: Latchtool bind off 2 stitches on left side of bed. Knit across row.  
  8. Row 2: Latchtool bind off 2 stitches on right side of bed. Knit across row.  
  9. Row 3:  Latchtool bind off 1 stitch on left side of bed. Knit across row.
  10. Row 4:  Latchtool bind off 1 stitch on rightside of bed. Knit across row.
  11. Repeat rows 1-4 until no stitches are left. 
  12. Attach to the poncho neck filing in the "V". 


Notes for Hand knitters.

You can knit this poncho very easily. However, you need to know the following:


All images, programs and text at this site are copyrighted.  Permission is given to knit sweaters and swatches from the directions provided.  @copyright 2004, Lucia Liljegren