Top of Site
These are general schematics for Roz's poncho. There are no
dimensions; they just give you an idea about this poncho. You
will also find assembly instructions.
Begging!
If you are thrilled with this generator, please click to donate and
assist me with my constant quest to buy yarn and pay my mortgage and
keep my husband for bugging me for spending too much money!
Support
my site with a $3 donation!
My site is supported by your annual $3 donation. Please click the to
make a $3 donation.
 Back:
Back:
To knit the back, you cast on at the hem. Knit, shaping both
sides at the rate indicted in the pattern until you reach the
shoulder. The shoulder is indicated by a horizontal rule in the
row/stitch table. In the picture to the right, the beginning of
the shoulder is the "kink" in the diagonal line on the left side.
When you
reach the shoulder, you suddenly reduce stitches very rapidly.
Then you bind off all the stitches for the neck.
If you have knit many sweaters, you will recognize that the shoulder
shaping is similar to shoulder shaping on sweaters. However, the
rate of reduction at the shoulder will seem slow compared to shoulder
bind offs on
sweaters. This is because the poncho piece will be rotated when worn.
You will see this in a later schematic.
When you finish knitting this first back piece of the poncho, it will
look as pictured to the right.
You will then knit a mirror image of the piece pictured at right.
Sew the two pieces together along the center back matching points c-d
on
the two pieces to form the whole back.
Hand knitters: You can make this piece too. However, your busy
little minds are probably already thinking: Why not knit it in one
piece? Well, you can, just cast on stitches for both back pieces, place a stitch
marker in the center, then decrease along the center and the
back!
Information the program will tell you about this piece:
- The width of the top of the trapezoid. I have labeled this
labeled this "neck" and runs between points b and c.
- The length of the diagonal from c to d. Actually, you
specify this length when designing.
- The width of the hem from a to d.
- The slant of the shoulder, labeled gamma.
- The flare angle, alpha ,indicated at the center back and the side
of the poncho.
 Front:
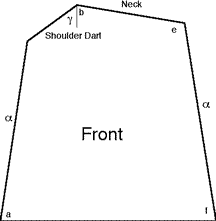
The front is pictured to the right. It looks exactly like the back
except the neck is lowered. Note that if you specify no shortening of
the front neck diagonal, the
front will look exactly like the back. I advise lowering the
front neck when you make a sweater will a very small amount of flare,
otherwise the neck may choke you.
To knit the front, you cast on and work exactly like the back until you reach the neck, which I
labeled point "e". The row/stitch sheet will tell you the
row/stitch count of the row just before "e", and then give you detailed
shaping directions after "e".
After you reach "e", you begin to reduce
rapidly to shape the front neck line. This is very similar to V neck
shaping on a sweater. However, the neck will seem more shallow than on
a sweater.
You will make one front piece shaped like the picture and then one
mirror
image of the one in the picture. When you assemble, sew the two
fronts together along the diagonal line labeled e-f.
I have indicated a "chevron angle" alpha (a) on the picture. (I can't seem
to get greek symbols in HTML!) To see this angle, examine the far
right hand side of the picture. The included angle between a vertical
line and the shaped diagonal seams is "alpha". I drew an
alpha of about 20 degrees in the picture.
The shoulder dart angle is "gamma". That's shown near the "b" and is
also measured from the vertical up the the diagonal shoulder shaping
line.
Information the program will tell you about this piece:
- All information shared with the back piece.
- The amount you have shortened the front diagonal.
 Whole Poncho:
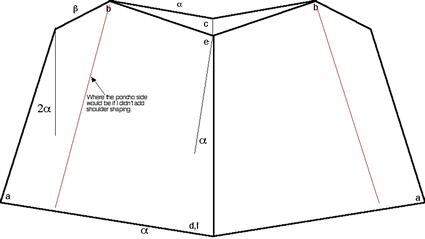
The whole poncho is illustrated at the right. For purposes of
illustration, I have drawn a very wide stumpy poncho.
The front is shown
lying on top of the back. Note that both the front and back neck form
V's. The back neck forms an angle alpha from the horizontal. This
happens when the two back pieces are rotated and sewn along the
diagonal. The depth of the back neck in indicated with the
abbreviation "bnd".
The front neck drops more deeply than the back. This is due to the
shaping. The front neck depth is indicated with the abbreviation
"fnd".
Notice the angle "beta" illustrated above the left shoulder. This is
the angle the shoulder will make from the horizontal. The program
will tell you the value for your poncho. Right now, I have coded a
default angle of 10 degrees. People's shoulders tend to slope down a
bit.
The poncho program is designed so that the shoulder kink occurs when
the poncho is as wide as your shoulders. Due to rounding, the poncho
shoulder width may be a little big larger than your actual
shoulder width. Your shoulder width is one of the design
parameters you are asked in specify; it is illustrated at the bottom of
the schematic.
The width at the hem is indicated on the poncho. I haven't programmed
the page to tell you that value yet.
Information the web page provides:
- The front neck depth and the back neck depth.
- The neck width.
- The total head opening. This is not illustrated. You would
determine it by measuring the top of the back trapezoid and the front
trapezoid, adding and multiplying by two. It is almost equal to
the 4 times the width of the top of the back trapezoid, but differs a
bit because the front trapezoid is a little longer.
- The width of the shoulders (that you enter.)
- The shoulder angle beta.
- The value of the side flare. On this style poncho, this is equal
to (2 alpha).
Assembly:
To assemble your poncho, you will sew the two fronts together along the
center line, matching points e-f on the two pieces. Sew the two
backs together matching c-d, and seam. Lie a front onto of
the back as indicated in the schematic to the right.
Seam along a-b.
Then apply a neck treatment of your choice. (I don't
suggest anything in particular. You can just add several rows of
stockinet, add a tall ribbing, etc. anything you like.) Add a
hem treatment. Then sew the final side shut.
Comments on poncho fit and necklines.
I have added a red line to the poncho picture. The red line illustrates
how the poncho would look if it were a simple 4 piece trapezoid poncho
with no shoulder shaping, but the same value of "alpha" as in the
picture shown.
Notice that the poncho would be angled very, very
steeply at your shoulders. If you wore a poncho with that
type of shaping, the poncho would rest on your shoulders where ever it
managed to be as wide as your shoulders. If the neck were a stiff
fabric, it would form a cone around the neck. I call this
"coning". Because knit fabric collapes, the neck
tends to bunch. So, other people describe this as "bunching". Some who
make these ponchos and want to sell the poncho, tell you it's a
design feature and all ponchos are that way. (They usually know it's a
mistake and stop making these.) Other people just call it
"icky" and, if they are a knitter, they unravel the whole poncho.
Because I drew a particularly stumpy poncho, with a very small value of
alpha, notice that in this case illustrated, the hem of the poncho
would rest on your shoulders! The knitted
neck above your shoulders would collapse down around your neck.
I've never seen someone design a poncho quite as bad as that!
But... let me just say.. that the reason Roz asked me to write this
program is that she got some directions for a 4 trapezoid poncho....
and she wanted to make it very slim with a nicely fitted neck....and
the neck coned up around her neck very unattractively. She
unraveled the whole thing!
You are probably thinking... but I've seen 4 trapezoid ponchos, and
they are just fine. Yes, you have. Some are just fine.
People make them. They love them. Their friends imitate
them. Then someone decides to modify the pattern "just a little".
So, when do ponchos cone excessively? They cone excessively when
the side angle (2 * alpha in this picture) is small and/or the neck
width is small.
The side angle is small when a person wants to make a fairly slim
fitting poncho. Not stupendously slim mind you, just what I call
slim on my poncho page. (Look at the teal one here; it's officially "slim".)
They don't cone excessively if you make a poncho with very wide flare,
look at the hot pink one here. I call that one "wide".
What if the poncho flare is intermediate? Poncho's will never
wide nearly off-the-shoulder neck. What's to cone? People
often make wide necks and add a turtle neck collar to stay warm. I've
seen some sexy lace ponchos with nearly off the shoulder necks. These
are alluring when you wear them over a lycra sex-in-the sity type
dress underneath. Va-va-va-voom!
As for me (and Roz) we both wanted a slim poncho with a small neck.
Actually.. you do too.... Don't you. Knit this one. It's not any harder
to knit this than to knit the geometrically simpler poncho.
Writing the program was more involved... but it's written, isn't
it? :) To draft you poncho, visit
Roz's
Poncho.
Lucia
 Back:
Back: Back:
Back: Front:
 Whole Poncho: