|
 Poncho
III: "The Roz" Poncho
III: "The Roz"
Main site, blog
This
page has a generator (aka program) to let you come up with the shaping
to knit this main portions of this poncho. It also has links to Roz's
page and Natalies pages. They describe how to make the fringe and the
neck! (Yep, you have to chase the whole thing down.) But, the
shape is worth it: This poncho will
fit across the shoulders. That's why Roz contacted me to
write a generator for the shape!
You must have your browser set to run javascript and accept
cookies to run this program.
Type: Knit bottom up in 4 pieces.
AKA: Roz's poncho (Because Roz wanted the generator.)
Click for other my ponchos or off-site poncho links.
Charateristics of this poncho:
- is knit bottom up in 4 pieces.
- is worn with a point down the front.
- can be slim to wide fitting, as the user chooses.
- has special shaping near the shoulders to prevent
the "neck cone" or "bump" you see in traditional ponchos.
- is easy to shape over the major portion of the
poncho.
Plus, if your javascript is running... (and it had better be or this
program won't work).
- can be hand knit or machine knit in any gauge.
- can be knit an a stitch pattern of your choice. (Roz picked
stockinette, which makes sense when test knitting.)
- Right now, the poncho generator does
not tell you how to make the
neck or add the fringe. The directions for the fringe are at Natalie's
page. I'm guessing machine knitters would sew all seams
except the front, hang the neck on their machine, and knit ribbing to
the desired depth, then bind off.
- The generator also does not tell you how much yarn you
need. (I'm
thinking about coding that. You would need to weigh your swatch
though.)
- Natalie kindly posted Roz's
tips! So I don't have too. Roz gives thorough tips on
exactly how she cast on, how she bound off, how she made the neck
and the fringe.
Remember: Like all patterns spit out by my generators, this is
mostly shaping
directions. The purpose of the generators is to let you be
creative, while eliminating the need to do pesky
calculations. You decide how you are going to increase, decrease
etc. I'll make
some suggestions, but they won't be detailed. You pick your yarn,
needles etc. You want a poncho with a wider hem than Roz's? Tell
the program you want to decrease ever 2 rows instead of every 4-- which
is what Roz did. You want it longer? Tell it longer! Hey, I was a
biker chick poncho on the web, it just covered the shoulders. You
can do that.
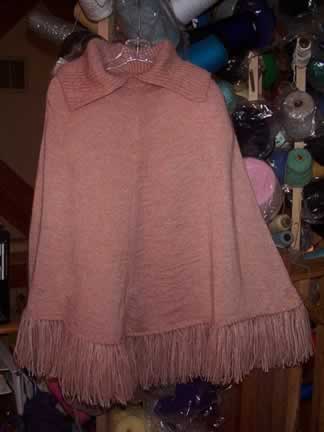
Believe it or not,
this is NOT Roz's"final"
poncho! It shows the shape she knit and what you can do.
Roz plans to knit her final poncho is a "yummy" yarn.
|
|
Ok.. here's the story. Roz found one poncho pattern on the
web. She knit it. The neck coned. She found a second pattern. She
knit it. The neck was so wide she could wear it as a skirt and
the hem width was really, really wide. That was a cute poncho
with a lot of flair, but it wasn't what she wanted. She unraveled.
So, she heard I had "figured out" how to design slim
ponchos with necks that don't cone or bunch....
And she emailed me....
I told her I'd write the pattern if she test knit it. I already have
3 ponchos.
(Are you getting the impression I might write a generator for the
shape you want? I might. Ask. It depends on what I'm writing at the
time and my mood. Of course, you may be required to test knit and send
me a picture.)
When Roz requested I write a third poncho generator, based on her
previous experiences, she was going to use a "doesn't matter yarn" to
test
knit and make sure it the shape fits. (Although, the
yarn she used looks pretty nice to me! )
She told me she was holding her Italian "wonderful" yarn in
reserve after she checked out the fit. Who can blame her? She's
pretty brave to test knit this.
She says this test one
fits great. As you can see, the rib neck in not hiding a "neck
cone".
I think Roz used:
- 1 st. every 4 rows. Decreasing faster will result in a wider
hem. Decreasing slower will result in a more narrow poncho.
- 16" shoulders (to go over clothes.)
- 27" length.
- Width at top x 4 = 17". (Approximate head opening.)
- "Doesn't matter yarn." (She bought it for $8 a cone at Webs. It's
some kind of fuzzy mohair blend. That's all I know.)
- Lowered the front neck by about 1/2". (You will notice when you
fiddle that you can't pick any extra shortening length you want. You
are limited to multiples of the height of two rows. I'll round for you.)
- The back neck width ended up 8", and the back neck depth ended up
1.4". The front neck ended up 2" deep.
I don't tell you exactly what to do at the neck. Everyone wants
to do something different. When Roz finished, she added
ribbing at the neck and Natalie's
Wooly Worm fringe. (Roz says "3 stitches, 6 rows all around." I'm
assuming I'll understand that when I read about Natialie's Wooly Worm
Fringe.)
Have fun knitting the poncho,
Lucia
Begging!
You can run the calculator for free today. I'll update to make
people pay someday.....
Meanwhile, if you feel generous, I'm asking for
donations. Assuming the donations come in at the usual
rate, I can easily convert any donation into a subscription when I
change this into for pay. Please click the to
make a $3 donation.
|
Enter Data for Your Poncho
You must modify the following data to match the gauge and shape you
want! Just change the numbers,the form should automatically
calculate. It is best to click outside the box to make sure the form
knows you finished entering a number. Or, with internet explorer, hit
your tab key. That works like a charm!
Looking at the schematics and some knitted
ponchos may help you understand some of the
values in the form below; to see generic schematics of this poncho,
click schematics.