Capelet

This page has a pattern generator (aka program) to create a pattern for a machine knit capelet.  You can make your capelet shorter or longer than mine, use yarn like mine, or use heavier yarn.   The generator will spit out the pattern you  want.

Main siteblogPoncho collectionPoncho I, Poncho II, and Poncho III.

You must set your browser to run javascript and to accept cookies to run this program.

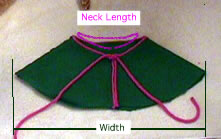
Characteristics of the capelet:

  • Knit from center front to center front using short rows.
  • I-Cord Closure at neck.
  • Eight turning regions. (The future cape will permit 8 or 12 turning regions.)
  • Shoulder darts.
  • MK  This pattern can be hand knit, but it would be difficult to convert. 

Remember: Like all patterns spit out by my generators, this is mostly shaping directions.  The purpose of the generators is to let you be creative, while eliminating the  need to do pesky calculations.  Depending on the generator, you may get a lot of design information which you may ignore or figure out depending on your personality.  You can always  just imitate the capelet picture!

Lucia

Google
 
Web thedietdiary.com


Design your capelet!

two piecesYou will need to design your capelet.  You must pick a neck length, a "width".  That's it!   (I'll probably tell you some other dimensions, after I take another picture and illustrate it!  The program will automatically create a pattern with the back  neck raise a little (so the cape doesn't drop forward), and with shaping to fit your shoulders.  (  This is too much information, but I've been experimenting a bit to find the "perfect" angle for shoulders. The example is a bit too sloped, and I modified the program to slope them a little less. So, you're cape shoulders will slope about 2/3 this much when you lay it flat on the floor. I'm not going to have you select a slope-- I'm just going to code the correct value in.  I'll take a picture of the final capelet and replace this one when I knit the final capelet-- which should be soon.)

To understand these dimension, examine the schematic to the right, which illustrates the basic cape shape.   You can make the width be whatever you want it to be!  I made mine really small because I wanted to check the program. 

For my capelet, I specified:
My cape took about ?? oz of fingering weight yarn, knit at ?? st/in. 

I tell you what I did at the neck, but everyone will wants to do something different. 

Have fun knitting the capelet,
Lucia

Begging!

You can run the calculator for free today. I'll update to make people pay someday.....  Meanwhile, I'm asking for donations.     Please click the to make a $3 donation. 


Enter Data for Your cape

You must modify the following data to match the gauge and shape you want!  Just change the numbers, and click "calculate" when you are finished.
Looking at the schematics may help you understand some of the values; to see generic schematics of this cape, click schematics.

 
Replace My Gauge Swatch Information your Gauge Swatch Information
Note  any machine setting by hand.  You must use the same machine setting when knitting the swatch and the cape!

Stitches per inch: 
Rows per inch:

Replace My Cape Shape Parameters with Yours 
Neck opening
inches
The minimum neck opening based on your row gauge is inches.   If you want a tighter neck,  you must use a finer gauge yarn. 
 
The front neck depth is inches. The back neck depth is inches.  The width across the neck is inches.
There will be is   rows around the neck. 
Width of cape: inches. The "width" is found by folding the cape and laying it flat on the floor, then measuring a straight line from point to point,  as illustrated in the figure above, this will be the width.  If you make pick your shoulder width, the cape will end at your shoulders.   Smaller than that is a collar; longer is a capelet.

Based on the parameter you have entered so far, you will be instructed to cast on between needles    and   .  Enter a value here to shift that  
Based on thise width, and neck opening, the minimum length you can pick for your cape is  inches down from the front neck.)

I'll code this warning box in the future.  It will warn about too small neck, or any other problem I am aware of that makes the cape unknittable.  (The too small neck results in a divide by zero error, and if you don't read the pattern before knitting, you will suddenly come across instructions telling you to knit negative numbers rows and infinite numbers of rows. I don't want you to do that.  I will be coding to permit smaller necks later on.  I just want to test knit the general shape first.)

Front length of cape: inches.
This box  and row are  here in case I need to code something else later!  (I'm pretty sure I'm going to code a "shoulder width" and a total length separately because otherwise, all capes will flare very dramatically, and also take tons of yarn. I want to be able to make both a "Count Dracula" flaring cape and a "Demure Miss" not too flaring cape!

Note to Sylvia: The two piece cape that lets you go floor length will come later!


Results: Your Cape Pattern

Don't try to edit anything below this point.  If you want to change them, change values in the table above. The summary tables are for informational purposes only.   This is a program. So, please read through al the directions and make sure no negative numbers appear.  (I try to think about where they might appear and create a warning box, but I don't always think of them all.)

Yarn Estimate: Will Exist after Capelet is Knit.

Knitting Instructions.

Some abbreviations: RC = Row count read out.  COR= Carriage on Right. COL = Carriage on Left.

Make idiot cord pieces:

You will need 2 of these.

Warning: Don't pull the I- cord. It's easier to hang if you don't.
You will be instructed to hang row markers. I advise using two or three different color markers and alternating.  Note which colors you hung at which point.
  1. Set machine one tension setting tighter tension than you will use for the cape.  Cast on over 5 stitches in waste yarn.  Knit a few rows.  Hang a light weight. 
  2. Set machine so it knits in one direction only.  (I push in one part button on my Brother. I set CX on my Passap and knit on one bed only. Change to cape yarn. Knit 10 rows.   (You will unravel these and throw them away. They just help if you miscount when rehanging.)
  3. Notice the trim will start to form a little tube with some bars along the back.  To make it even easier to avoid twisting the I cord when you attach it to the poncho I-Cord later on, use a tapestry needle to periodically draw some colored yarn through the horizontal bars as you knit the I-Cord.  You will pull this out later. (Click to see.)
  4. Set row counter to zero.  RC=0  (This will end up aligned with the waste yarn.)
  5. Knit until row counter reads RC= .  
  6. Knit 10 more rows to be safe.   You'll unravel these at the end.  (If you want a neck tie for the I Cord, knit a whole bunch of rows.  Just make it really long-- long enough for the tie.)
  7. Change to waste yarn, knit a few more rows. Break yarn, remove cord from machine. Anchor live loops with a safety pin or a piece of yarn. (You'll unravel later.)
  8. When you hang I cord, you usually want to hang one loop from the side of a stitch next to the column of bars.   From now on, when I refer to a row of I cord, I  mean one knitted row. If I'm sloppy, I may also say one "stitch" or one "loop".  (Yep, I may use different terms for the same thing.) For reference:  It took two carriage passes to knit 1 row of I cord.  The other pass made that little column of bars.  The column should be "below" the needles.
Next, make one long I cord piece.  Put a tape around your neck, and let the ends hang down to where you want the end of the I-cord to hang. (Like my ties.)  Make an I -Cord, measuring as you knit until it is the length you like. Then, knit at least 5 inches more "to be safe".  When you make your cape, you will be folding this in half and hanging it on the machine and attaching it to the neck. You can always unravel extra. But, if you make a mistake and don't hang it in the center, you will regret not having the extra few inches!

Knit Major Cape Piece

Skill: You need to know how to work short rows. Consult your manual; it may be called "partial knitting". 
Note: The hem of the cape is on the left side of the needle bed, the neck is on the right.  The direction wording assumes you are knitting stockinette and the knit side will be the "public" side of the garment. The purl side is the "wrong" side.  This matters when you are rehanging pieces and assembling on the machine.

Your cape pattern has 8 turning darts and 2 shoulder darts.  I advise writing check marks in one color ink as I work each step.
  1. Bring  needles on the bed to work position. If you want the cheat sheet to match the needle bed, the left needle should be  and the right needle should be  
  2. Take the     needles furthest to the right completely out of work. 
  3. If you want to create the no-roll edging, raise two needles on the far left.  Afterwards, take the 2nd and 3rd needles, and 5th and 6th needles on the far left out of work.   You will later reform 1 column of stitches in each gap.   So, this leaves the same effective number of stitches in work as instructed.   Later, when following shaping directions for darts, consider each gap to correspond to 1 needle.  (Hopefully, this will become clear when  you are getting near the end of the dart shaping.)
  4. Hang I-Cord on needles, with one I cord loop per needle.  You'll have a few extra I-Cord loops on each side. That's ok. (If you want a little neck tie like mine, hang I cord with the long end hanging off to the right.)
  5. Cast on over needles. This is the center front.  
    1. Knit until row count reads RC= rows. (COR)  
  6. This is the first "main rectangle".  At the beginning of this rectangle, there are needles in work. As you follow the lettered instructions you will bring    needles on the right hand side of the bed into work.  Hand knitters should find it measures inches.
    1. Set row counter to zero.  Knit rows
    2. Increase 1 stitch on right hand side of the bed. Knit    Rows. 
    3. Repeat "b"    times.
    4. Knit  rows.
    5.  You should have  needles in work.  (RC = )
  7. You have reached  turning dart 1.    You will probably want to rehang weights periodically. 
    1. The general instructions for every turning dart are the same. However, the total rows worked changes.  
    2. Set row counter to zero RC=0.
    3. Knit 1 row.  COL 
    4. Set machine to partial knitting. (H on a brother.)
    5. Move needles on right hand side of bed to non-working position.  Knit 1 row, wrap, knit 1 row. (COL) [Note: the right hand needles raised to non-working position won't knit now.  It's a short row.]
    6. Move needles on right hand side of bed to non-working position. Knit 1 row, wrap, knit 1 row.  (COL)
    7.     step d.
    8. Note: You are taking  needles out of work every  rows.
    9. Repeat  c-e until you notice there were fewer than  needles out of the previous carriage pass.  With COL, RC= .  
    10. --------   You are one row past the dart center, and will now begin putting the needles back in work mirroring the first part of the dart -------
    11. Do steps e-c in reverse order.  That is, instead of raising needles on right hand side to non-working position, move them to upper working position so they knit on the next carriage pass.   The dart is complete  when you notice you just worked a row with all needles knitting.  This row mirrors the row knit in step "c".  ( The carriage will be on the right, and the row count will beRC=  . )
  8. This is the second "main rectangle".  At the beginning of this rectangle, there are needles in work. As you follow the lettered instructions you will bring    needles on the right hand side of the bed into work.  (Hand knitters should find it measures inches.
    1. Set machine to full knitting. (N of a Brother.) Set row counter to zero.  RC=0.
    2. Knit rows
    3. Increase 1 stitch on right hand side of the bed. Knit   Rows. 
    4. Repeat "b"    times.
    5. Knit  rows.
    6. You should have  needles in work.   (RC = )
  9. You have reached turning dart 2.  Work as for turning dart 1.  (Step 7.)
    1. However, since there are more stitches in work, when you reach the dart center, the row count will read
    2. The dart is complete at RC=  .
  10. You have reached the "shoulder rectangle". It's a rectangle with a shoulder dart in the center.
  11. Set row  counter to zero.  RC=0.
  12. Knit _____ rows.
  13. ---------------------You have reached the beginning of the shoulder dart.----
    1. Set row counter to zero.  Knit 1 row.  COL
    2. Set machine to partial knitting.
    3. This is worked similarly to the turning darts except the number of stitches per pass is different.
    4. Move needles on right hand side of bed to non-working position.  Knit 1 row, wrap.   Knit 1 row. (COL) [Note: the right hand needles raised to non-working position won't knit now.  It's a short row.]
    5. Move needles on right hand side of bed to non-working position. Knit 1 row, wrap, knit 1 row.  (COL)
    6.     step d.
    7. Note: You are taking  needles out of work every  rows.
    8. Repeat c-e until you notice you left fewer than  needles out of work on the previous carriage pass.  RC= .  The carriage will be on the left at this point.
    9. You are one row past the dart center.
    10. Now, move needles into work at the rate just described.  When you finish, COR and RC= .
  14. Knit  rows.
  15. You have reached turning dart 3.   Work this like turning dart 1. 
    1. When you reach the dart center, the row count will read RC= .
    2. When you finish RC= .
  16. This is the third "main rectangle".  At the beginning of this rectangle, there are needles in work. As you follow the lettered instructions you will bring    needles on the right hand side of the bed into work.  Hand knitters should find it measures inches.
    1. Set row counter to zero.  RC=0.
    2. Knit rows
    3. Increase 1 stitch on right hand side of the bed. Knit     Rows. 
    4. Repeat "b"    times.
    5. Knit  rows.
    6. You should have  needles in work. (RC = )
  17. You have reached turning dart 4. Repeat step 6. 
    1. When you reach the dart center, the row count will read RC= .
    2. When the dart is complete, RC= .
  18. This is the fourth "main rectangle".  At the beginning of this rectangle, there are needles in work. As you follow the lettered instructions you will bring    needles on the right hand side of the bed into work.  Hand knitters should find it measures inches.
    1. Set row counter to zero.  RC = 0.
    2.  Knit rows
    3. Increase 1 stitch on right hand side of the bed. Knit     Rows.  (I increase by raising a needle, transferring the stitches on the two edge needles using my two prong tool, and then filling the needle with the bar from a stitch below.)
    4. Repeat "b"    times.
    5. Knit  rows.
    6. You should have  needles in work. (RC = )
  19. Knit rows.
  20. ------------You have reached the center back.  Go have a piece of chocolate!------------
  21. Now, work everything but mirror the directions. You need understand two things to mirror:
    1. Work the steps in in reverse order!  I've written the instructions so you work steps 19, 18, 17 etc. However, follow the lettered steps in the order written: that is: (a, b, c,) I advise writing "Xs" in a different color ink from the check marks as I work backwards.
    2. Where the instructions previously said "increase a stitch on the right hand side", decrease the stitch.  I decrease by transferring the two right hand stitches in one needle using my two prong transfer tool. Then I take the needle out of work.  Other than that, the instructions are the same!
  22. Take work off on waste yarn or garter bar.
  23. Optional: If you left some of those With a crochet hook, with the purl side facing you, latch up 1 stich in each the column of bars formed by the two out of work needles.  This is called reforming the stitches.  There will be a purl bar on the knit side and a knit column on the purl side. Then, anchor the stitch you just made.  When you rehang, hang one stitch per needle.  Transfer stitches to fill the empty two empty needles, and take them out of work. 
  24. Raise the number of needles used for the cast on. With the knit side facing you, rehang the cape.  Remove the waste yarn, and check that all the stitches are hung.  Hang I-Cord, one loop per needle.  Thread the carriage with yarn that matches the cape.  If you are right handed, place the knit carriage on the left side of the bed.  Knit across the row.  Latch tool bind off from right to left. (If you are left handed, reverse the left/right instructions! )

Neck treatment and finishing.

  1. Raise  needles.  Hang neck with knit side facing you.  Fold I -Cord to find center and hang the center loop in the center of the bed.  Knit 1 row.  Bind off.   
  2. Sew up I -cord pieces with the side I-Cord raw edges hidden behind the neck I-Cord. Unraveling extra loops if necessary and anchor the raw stitches.
  3. Tidy up all extra pieces of yarn.
  4. Steam (if appropriate for your yarn.)
  5. Wear.
  6. Take a picture and sent it to Lucia! Tell her she can post it to her blog.
  7. If you love your capelet and haven't donated, donate!


Notes for Hand knitters.

You can convert this cape  pattern to hand knitting.  I wouldn't call it easy though, since you need to work quite a few short rows and count. (This can be done, but eyestrain is a distinct possibility.)   However, you need to know the following:
End FORM TAG.
Google
 
Web thedietdiary.com


All images, programs and text at this site are copyrighted.  Permission is given to knit sweaters and swatches from the directions provided.  @copyright 2004, Lucia Liljegren