Poncho II:  Sidesways Knit Poncho (AKA: Charlene's Poncho)


magental and blue

This page has a generator (program) to create a pattern to let you knit a poncho pattern in your size using your own yarn.  It has lots of options for shaping. It's really 4 poncho shapes in one generator! Two of the shapes are "officially" two panel ponchos, and two are "officially" one panel ponchos. (But you knit them all in one piece with short rows to shape.)  You'll see a lot of explanation to help you decide how to design yours. Scroll down and fiddle with the generator to understand though.

Feb. 15, 2004
Lucia Liljegren
Visit the whole site!  Or the blog, poncho indexponcho I or poncho III. And now poncho IV!
My site is supported by your annual $3 donation. Please click the to make a $3 donation.


Photo

Charlene asked what's a "generator"? So, I told her, a web based program to create a pattern in  your own knit gauge and your own size. I think I made the word up...

Anyway, she replied.. "Well.. I guess I'd like a poncho generator!"

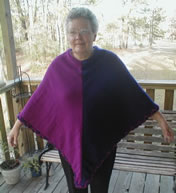
Well... she was the first to use the Poncho II generator. You can see her poncho, and my poncho and schematics of these ponchos by clicking Charlene's Poncho page.

Charlene's question made me realize that I also really, really needed some ponchos. The fashion designers have been showing lots of ponchos on the runways, so I guess they are "in". They are also amazingly practical for travel, and I'm going to on vacation next week. (I've got to escape freezing cold Chicago!)

I've written two poncho pattern generators now. The first was hand knit top down. I made that poncho for my doll. I wanted to gain confidence with the shoulder shaping and I didn't want to waste yarn. 

Hand knitters will probably like that poncho shape.  You can see that poncho generator here: Poncho I


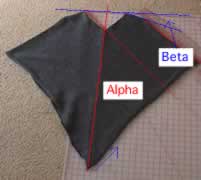
So.. my poncho and Charlene's are different from each other, right?  Well, you can create patterns for either one at this web page. 

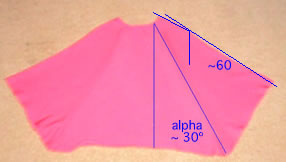
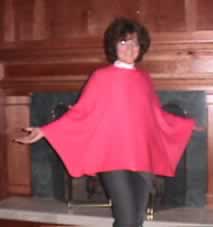
As you can see, one poncho is wider than the other. Charlene's poncho and gray poncho below are the style I call "medium" on this page. My pink one is the "wide" version.  There are 4 widths all together, and you can choose any on this page.

The gray poncho below is knit from Brown Sheep Nature Spun fingering yarn, which I bought on 1 lb cones.  The poncho took about 6-8 ounces of yarn.  The gauge is about 7 st/in.  The pink poncho is knit from yarn I impulse bought when I passed a yarn store while on vacation 5 years ago.   The yarn was cheap, cheap, yeap!!!  And it's very soft, warm, and 100% wool.   The yarn is amazingly thin; I used 2 strands to obtain a gauge of 8 st/in.  (We all have impluse buy yarn... right?  And we have no clue what gauge it's going to knit up to? That's why we all need generators!)

Notice the pink "wide" poncho flares out more than the medium poncho.   This page permits you to generate ponchos with 4 basic flare types, which I call "slim", "medium", "wide" and "full".  Many of the ponchos on the runway are of the "slim" variety, which is slimmer than either shown here. I'm going to knit myself one of those in turquoise tomorrow on Monday, so you'll see a blurry picture of that poncho soon.    I also programmed a really, really full poncho, which I call full.  See how I'm holding my arms to the side in the pink one? Well, if it were "full", I'd be able to hold them straight out and the poncho would just drape down.   I'm not planning to make the "full" poncho.  However, the full poncho would be great to wear camping; it would give you lots of room for arm movement. 

Anyway, scroll down, and create your own pattern.
Google
 
Web thedietdiary.com
Lucia


To see more poncho styles, visit the illustration page.

Poncho with angles shown.Information about ponchos and this generator.

pink poncho

Remember: Like all patterns spit out by my generators, this is mostly shaping directions. I suggest methods to increase and decrease, but you can feel free to change them.


Donation Request

If you are thrilled with this generator, and actually knit a poncho, please click to donate $3 to and assist me with my constant quest to buy yarn and pay my mortgage and keep my husband for bugging me for spending too much money!


Enter Data for Your Poncho

You must modify the following data to match the gauge and shape you want!  Just change the  numbers, and click "calculate" when you are finished.

Enter Your Gauge Swatch Information
Main stitch pattern: Used for most of the poncho
Main stitch pattern name:
Stitches per inch:
Rows per inch:
Poncho flare:

Pick a main stitch pattern.   Yep, try stockinet, garter stitch, ribbing, fair-isle, tuck stitch, lace or anything you like.   However, since these directions require knitting short rows, you must be able to set the carriage to knit partial rows using your stitch of choice. 

Measure your gauge from a that is at least 4" wide and 4" tall; larger is even better.  Calculate the gauge to 3 significant figures (e.g. 4.25 st/in not 4 st/in) then enter the numbers in the boxes to the left.   If the current numbers don't match your gauge, you're poncho won't fit. So, put your mouse in the box and change the numbers. Poof. New pattern!

Not to repeat myself but... make a big gauge swatch.  Knowing your gauge is very important!

Pick your poncho flare.  This program determines an increase rate worked over either 4 or 6 rows that results in a slim, medium, wide or full poncho.  Slim and medium ponchos are knit in two pieces; wide and full ponchos are knit in 4 pieces.

Slim and wide ponchos try to make the chevron angle approximately 30 degrees. (I call this the "target" chevron angle). Medium ponchos have a target chevron angle of approximately 45 degrees.   Full ponchos have a target chevron angle of approximately 40 degrees. 

The "EZ" ending will ensure the repeat is over 4 rows and not over 6 rows.  The EZest ending ensures the repeat will be over 2 rows.  These choices may cause the chevron angle to differ from the target value.  (  I have no trouble remembering the 6 row repeat because I make myself a row/stitch count cheat sheet and use my row counter.)

If you pick an "EZ" or "EZest" ending, do verify that you like the shoulder angle, beta, which appears below.  I have coded these to give you design flexibility. 

For the currently gauges and poncho width specified in the boxes to the left, you will be instructed to increase stitches over rows.

For your choice of flare you will knit trapezoids. 


Enter Your Poncho Shape Parameters
The default values are for a doll poncho. Type in values for you.
Head opening : inches.  
Enter the size of the opening you want for your head.  The program will match as closely as possible, but may round up or down.   I can fit my 22" head through an 18" opening, so I typed 18" in place of the 9".
For a your poncho, at your row gauge, the width of the top of the trapezoids will be: inches.
Length of Poncho along diagonal seam: inches.
Enter the length you would like along the poncho diagonal.  I like 25" ponchos, so I'd enter that.

It has to be long enough to make the poncho cover your shoulders. If it's not long enough, I'll warn you here:

For any poncho worn with the diagonal down the front, the diagonal length will be the length you neck to the bottom of the point in the front and/or back.   If you wear the full flare poncho with the point down the front, the diagonal is also sort of the full sleeve length. (That is, the sleeve plus some length that covers your shoulder.)

When designing, it is advisable to check height of the trapezoids. It is equal to: inches.  (To change this value, modify your style choice, or the length of the diagonal.) 
Due to rounding, the actual diagonal will be inches.

For slim and medium ponchos, this height of the trapezoid is sort of the full sleeve length.
Shoulder Darts:
If you are knitting a "medium" or a "wide" poncho, choose whether or not you want darts. If you are knitting a "slim" or "wide" poncho, I ignore your choice.  Please read the description above to learn about darts on this style.
  • If you chose darts, the neck will fit very, very nicely.  The poncho instructions will be more complicated.
If you set shoulder darts to "no", double check the shoulder angle box in the Summary Data Table below and make sure you are happy with that angle.   If you are not happy, don't knit a poncho using the stitch you selected.
Shoulder Width: inches You must enter the desired shoulder width for ponchos with shoulder darts. The value is not used for ponchos without darts.   I am a 5'4" woman; my shoulder width is about 14.5".  If I were planning to wear the poncho over a sweat shirt, I'd add at least a 1/2 inch wider, so I typed in 15" for my poncho.

If you don't know your shoulder width, you can get someone else to measure your width between the shoulder bones on your body, or measure the width off a favorite blouse.  Or, take a look at this catalog size table for adults, or this one for kids.

When in doubt, guess larger shoulders rather than smaller shoulders.  Poncho's look ok with "drop shoulders".

The head opening must be smaller than twice the shoulder width. If it is not, I'll warn you here:


To calculate the results, click the button!

Results

Don't try to edit anything below this point.  If you want to change them, change values in the table above. The summary tables are for informational purposes only.  

I Calculated These Values
Alpha degrees. This is the chevron and tells you something about stripes would meet at the diagonal seam.    The chevron angle depends heavily on the your choice of flare, and slightly your stitch and row gauge.  When worn, your poncho's side flare will be: degrees.
Height of trapezoid: inches.
For a two piece poncho, this is  the full sleeve length of your poncho.
Width of one trapezoid at hem: inches.
The full hem is inches.  (I may have subtracted the un-worked dart width for two of the pieces.)
When you lay the poncho flat with the point facing down, the width at the widest point will be inches.
Gamma: degrees. You probably don't give a hoot about this angle.  It's the dart angle as knit. If you don't change my value for beta (below), gamma will be a little less than 60º for the slim poncho and a little less than 45º for the medium poncho. If you choose darts, it will be little less than 30º for the wide poncho.
Beta (shoulder angle): degrees.  


This is the shoulder angle as measured from the horizontal when the poncho is knit. A positive value means the shoulders slope down; a negative value  means they slope up. (Human being's shoulders slope down. )

The value of Beta depends on your gauge, the poncho flare, and the whether or not you will be knitting shoulder darts. If you are knitting shoulder darts,  Beta is as close to degrees as I could get while still writing fairly simple directions.  (If your design uses darts, you can change the value in the previous box!  The shoulder shaping will change. However, I recommend avoiding having beta fall outside 0 and 20 degrees.  That said, many people wear ponchos with Beta near 30º, and are perfectly happy with the fit at the shoulder. )

If you are not knitting darts, Beta may fall outside the recommended range of 0º to 20º.

Stitch Summary Table


Location
Stitches
Width
Rows
Length
Cast On
Same as Begin Neck

0 rows
0 inches
First Short Row
stitches.

2 rows

Begin Neck
stitches
inches. rows. inches.
Begin Dart
Same as above.
Same as above.
rows.
inches
Center Dart (Shoulder)
stitches out of work. --
rows. --
End Dart
Same as begin dart.
Same as begin dart
rows
inches.
End Neck
inches. rows. inches.
After Last Short Row
stitches.
rows.
Bind off
Same as Begin Neck

rows inches.

Note: You cast on all the stitches and then knit short rows. So, you will always have the same number of stitches on the needle or bed.


Knitting Directions:

These directions include information for HK and MK.  The are also written to provide you lots of information so you can decide where to add any embellishments, should you wish to do so.  I suggest highlighting the relevalevant information so you can ignore the other information as you knit.

The poncho is made from   major pieces that are trapezoids; these major pieces are are sewn together on long diagonal edges to make one piece leaving one edge unsewn. Afterwards you apply edge finishes of your choice to the neck and hem. (I don't tell you how to do this. You can crochet around the edge, you can pick up stitches on a circular needles and add a row of garter stitch, you can do all sorts of things). Finally, sew the final diagonal edge and neck together.  Finish the ends and you are done.

Please read the directions from beginning to end. Make sure you understand them.  The values should all add up.

Here are some general tips for Machine Knitters using Japanese machines:

Poncho Side:

Make two.  Notes:
  1. MK indicates some special instructions for machine knitters. HK indicates instructions for hand knitter.  
  2. MK: COL = Carriage On Left; COR= Carriage On Right.   HK: COL means purl side facing you. COR means knit side facing.
Begin Neck
Shoulder Darts:
 

You  have reached the shoulder.  (Cumulative rows: rows since cast on. stitches were taken out of work when knitting the dart.)


End Shoulder Darts and Neck.


Option: You can skip the bind off and start the next piece.  This avoids seams. However, you will have one seam, and you need to decide whether it bothers you that some joins are seamless and one is seamed. If you do follow this option, skip the cast on and rows 1 & 2. Set the row counter to 2 and start with the first short row.  Since you won't seam this diagonal, you don't need those extra two rows.
Also, if you are knitting a 4 piece  poncho, be sure to knit  one piece with darts, then knit one piece without darts, then one with darts, then without darts!


More Begging!

If you are thrilled with this generator, knitted yourself a whole poncho and love it, consider supporting my site.  The best way is to make a $3 donation. Click the PayPal logo above!

Lucia Liljegren 2004.

All images, programs and text at this site are copyrighted.  Permission is given to knit sweaters and swatches from the directions provided.  @copyright 2004, Lucia Liljegren